With 2.4, you can get away with using just 1 windchart all the time. It's not perfect, but with experience it can be good enough, and I try to show the exceptions to the rules. The shots are low power so you 'feel' them a bit. With banpao, you really must be more careful with wind adjusting. The more power your shot has, the more airtime it will have the greater the wind's effect will be. For example, if the math says to lower your angle by 8.5 degrees, and you lower only 8, your 2.4 shot can still hit the front of the target. But with banpao, being off by half an angle is enough to cause a complete miss.
Still, despite all of this, banpao is a very nice shooting system for Turtle. The power level is high enough to make shots beyond one screen (it works up to 1.5 screens). It also is nice because when you're deep in a pit, or the enemy is deep in a pit, you will need to use a high angle shot to hit the target. Banpao uses higher angles than 2.4 - for example a half screen shot is angle 80 instead of 75. Some players say not to use 2.4 at all and just learn banpao. I think 2.4 is useful though and it's very similar to banpao. It's like a 'training formula' to get you ready for banpao.
Banpao basics
| Parts per screen: 20 | ||
| Power levels: 2.9 - 3.05 | ||
| Basic shots: | ||
| Angle | Power | Distance |
| 90 | 2.9 | Hits self |
| 85 | 2.9 | 1/4 screen |
| 80 | 2.95 | 1/2 screen |
| 75 | 2.95 | 3/4 screen |
| 70 | 3.0 | 1.0 screen |
| 65 | 3.05 | 1.25 screen |
| 60 | 3.05 | 1.5 screen |
As you can see it's actually not unlike the 2.4 system. Your shooting angles are still 90-60, but instead of using just enough power to cover 1 screen, you use enough power to cover 1.5 screens. The power level is 'around' 3 bars, which is why some people just call this the 3 bar formula.
It happens that 70, 3.0 bars covers 1 screen perfectly. And 90 hits yourself. So as you might expect, half screen is halfway between these... angle 80. As with the 2.4 system, you use a little less power for close shots, and a little more power for far shots. A close shot is under half screen (use 2.9 bars). For shots near 3/4 screen, use 2.95, and for 1 screen and a bit past use 3.0 bars. At the maximum distance, angle 60, you use 3.05. In 0 wind that will go 1.5 screens.
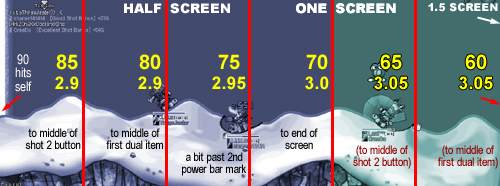
You can see I wrote in some shortcuts for measuring here. If you're used to using 2.4, it might be difficult for you to switch from measuring the screen in terms of 1/3rd or 1/6ths... to measuring 1 screen using 1/4ths. With banpao, it's 20 angles per screen (90 to 70) and every 5 angles will be 1/4th of a screen. So 85 is 1/4 screen, which can be measured from the left side of the screen to the middle of the shot 2 button. 80 is half screen, measured the usual way. 75 is 3/4 screen, which can be a difficult measurement. It's about 10 pixels past the 2nd mark on your power bar. 70 is 1 screen, measured the usual way.
To measure past 1 screen needs a little trick. What I do is first look to see where exactly 1 screen is. I lock my eyes onto some part of the background (or if you're lucky, some teammate/enemy) that is exactly 1 screen away from me. Then I drag the screen so that whatever I locked onto will be lined up with the left edge of my screen. Then measuring is the same as before... the shot 2 button will be 1.25 screens, and the middle of your first dual will be 1 and 1/2 screens.
Once you get the 0 wind measurements, it's time for the windcharts ^^. Banpao uses 3 charts, because high powered shots are more sensitive to wind, and you can't adjust an angle 60, 1.5 screen shot the same way you'd adjust an angle 80, half screen shot.